SwiftUI: handling images in Dark theme
One of the latest exciting addition announced by Apple at WWDC 2019 is dark mode for IOS. Basically, the app can display different colors if ran on dark comparing to light color scheme. The colors of your app can be defined in your assets, specifying a different color for dark and for light scheme, under the same color name. It is not as easy with images. Therefore handling images in Dark theme can be a really useful feature for your bag of tricks.
I recently ran into the very comprehensive collection of icon images from Icons8. They offer thousands of drawings that can be easily used in your app, providing a rich visual experience for the users. However, there is s slight issue regarding this: the defaultcolouring of the images is black on a white background. Of course I could invert them in Photoshop and provide 2 versions of the same image; however, this would make my image maintenance more difficult. Therefore I decided to implement a simple class, a replacement for Image, that can handle the inversion of the image colours , based on the environment color scheme.
isLight is keeping track if the image is created for a light background (with dark color foregorund ) .
@Environment(.colorScheme) varcolorScheme is
taking care of retrieving the current ColorScheme from the environment.uiImage method is taking care of loading the image with the given name from the app bundle and , if necessary invert it.
with the following effect:

While not a very complicated example, I think it is quite useful, in order to maintain a smaller amount of assets in your app; it can be used in the case when the dark version of the image is just an inversion of the light version one. See more SwiftUI posts here.
I recently ran into the very comprehensive collection of icon images from Icons8. They offer thousands of drawings that can be easily used in your app, providing a rich visual experience for the users. However, there is s slight issue regarding this: the default
1. Start with UIImage extension
Here is a UIImage extension that is able to inverses the colours in the image. I am using CIColorInvert filter provided by Apple. In the end, I convert the resulting image from CIIMage to UIImage extension UIImage {
func invert() ->UIImage?{
let context = CIContext(options: nil)
let inputImage = CIImage(image: self)
guard let filter = CIFilter(name: "CIColorInvert") else { return nil }
filter.setValue(inputImage, forKey: kCIInputImageKey)
let outputImgage = filter.outputImage!
let out = convert(input: outputImgage, withExtent: (inputImage?.extent)!, context: context)
return out
}
func convert( input: CIImage, withExtent: CGRect, context: CIContext)->UIImage{
let cgOutputImage = context.createCGImage(input, from: withExtent)
return UIImage( cgImage: cgOutputImage!)
}
}
2. Image replacement
Here is the simple DIImage struct, that encapsulates the Image.@Environment(.colorScheme) var
taking care of retrieving the current ColorScheme from the environment.uiImage method is taking care of loading the image with the given name from the app bundle and , if necessary invert it.
 public struct DIImage: View
 {
      var isLight: Bool = true
      var imageName: String
      @Environment(\.colorScheme)
      var colorScheme
      public init(_ imageName: String){
           self.imageName = imageName
      }
      public init(_ imageName: String, isLight: Bool){
           self.imageName = imageName
           self.isLight = isLight
      }
      func uiImage( light: Bool)->UIImage?{
           let image = UIImage(named: imageName)
           if isLight == light{
                return image!
           }
           return image?.invert() ?? nil
      }
      public var body: some View {
           Image(uiImage: uiImage(light: colorScheme == ColorScheme.light)!)
           .resizable()
      }
 }
3. Use it
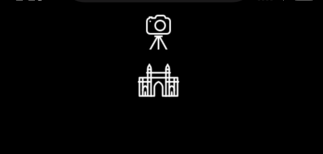
And now its time to use this control: struct ContentView: View{
var body: some View {
VStack{
DIImage("photo")
.frame(width:50, height: 50)
DIImage("sightseeing")
.frame(width:50, height: 50)
Spacer()
}
}
}
with the following effect:


While not a very complicated example, I think it is quite useful, in order to maintain a smaller amount of assets in your app; it can be used in the case when the dark version of the image is just an inversion of the light version one. See more SwiftUI posts here.


Comments
Post a Comment